Feed: gHacks Technology News
Create and join VPN networks on your Linux machine with Hamachi
If you are looking for a VPN solution for your Linux machine or network you have more than likely examined such solutions as OpenVPN. Many of the Linux VPN solutions require complex, time consuming set ups that can drive the new user crazy. Fortunately there are other solutions that do not require extensive knowledge of the Linux operating system or network configurations.
One such option is Hamachi. Hamachi is a zero-configuration virtual private network tool that allows you to set up a VPN between machines without having to go through the complex setup of the server itself. Instead Hamachi relies on the Logmein Hamachi servers to aid with the Peer to Peer connection. As for the user…all they need to do is install the tool and create their network. Let’s see how this is done.
Installation
I am going to show how this is done on a Ubuntu 10.10 desktop. Hamachi can be downloaded installed on othe! r distributions, but let’s stick with one here for simplicity.
The first step is download the proper file. You will find a .deb file for this tool here. Download that file to your ~/Downloads directory and get ready to install.
In order to install follow these steps:
- Open up your file manager (most likely Nautilus.)
- Navigate to the ~/Downloads directory.
- Locate the hamachi-gui-XXX.aaa.deb (Where XXX is the release number and aaa is the architecture.)
- Double click on the .deb file.
- When prompted, enter your sudo password to allow the installation to continue.
- Let the installation complete.
- Delete the .deb (optional) and close Nautilus.
Usage

Figure 1
To start the Hamachi GUI click Applications > Internet > hamachi-gui. This will open up the tools main window (see Figure 1). If you already know the VPN you need to join all you have to do is click the “triangle” button at the bottom of the main window. This will open up a new window that allows you to either create or join a VPN network. Let’s create a VPN network.
Click the “triangle” button and, in the resulting window, click the Create Network button. In this new window (see Figure 2) there are only two pieces of information you need to add:
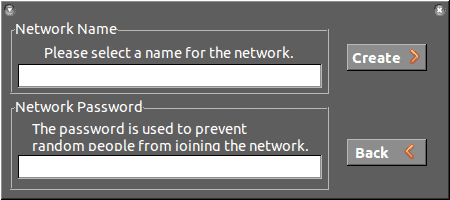
Figure 2
Name: name of your VPN
Password: Password to protect your VPN from unwanted users.
After you enter that information, click the Create button. The network will be instantly created and your machine will be automatically joined.
If you want to join a different network (or one you’ve previously created), you simply click the same triangle button you clicked to create the network, only you click the Join Network button next. When you click that button it will prompt you enter the credentials for the VPN. Upon successful authentication your machine will be a part of that VPN.
You can have as many VPN networks listed on your Hamachi client as you want. You want to pay close attention to which networks you are joined to. If a particular network has a green dot to th! e left of its name – you are connected to that network. To leave or join a network you simply need to right-click that network and select Change Status.
© Jack Wallen for gHacks Technology News, 2011. | Permalink | Add to del.icio.us, digg, facebook, reddit, twitter
Post tags: hamachi, Linux VPN, Logmein, vpn
Feed Info:
Name: gHacks Technology News
URL: http://www.ghacks.net/feed/
Add, Modify, Remove feeds at Innerfeed
0 comments:
Post a Comment
Post a Comment